
Source Control and Git Basics

First off, let me define what Source Control is so that I can give you a foundation to stand on for the rest of this discussion. When it comes to software development, one of the first things you need to determine when starting a new project is how and where you are going to store your code. Source control is the practice of managing and tracking changes to source code over time.
Let's imagine that you and your buddy have decided to develop a website. Now you have your starter code which for now is just HTML stored on your laptop. But your buddy wants to add his CSS to the project that he has stored on his computer. You need a way to access his code and he needs a way to access yours. Sure you can grab a USB stick or send him your code through an email, but there's no way that's going to be scalable for large projects and it is also incredibly inconvenient.
This brings us to Source Control Systems.
Source Control Systems
The two main different types of Source Control Systems are centralized and decentralized:
Centralized Source Control

- Code is stored in a centralized location. Because code is stored in a centralized location, when two people try and make a change to the code base there could be some conflict because of this.
- Offers stricter access control and centralized policy enforcement.
- There's no offline capabilities for this type of source control system because of its centralized nature.
- History is stored on the centralized server.
- Unlike Git, where you clone the entire repository including full history, centralized systems like SVN only give you a snapshot of the latest code.
Examples:
- TFVC (Team Foundation Version Control)
- Initially released in 2006, managed by Microsoft, and still available as an option in Azure Repos. Declining in popularity for modern development.
- Subversion (SVN)
- Initially released in 2004, managed by Apache, and is not available as an option in Azure Repos. Currently still maintained.
Decentralized Source Control
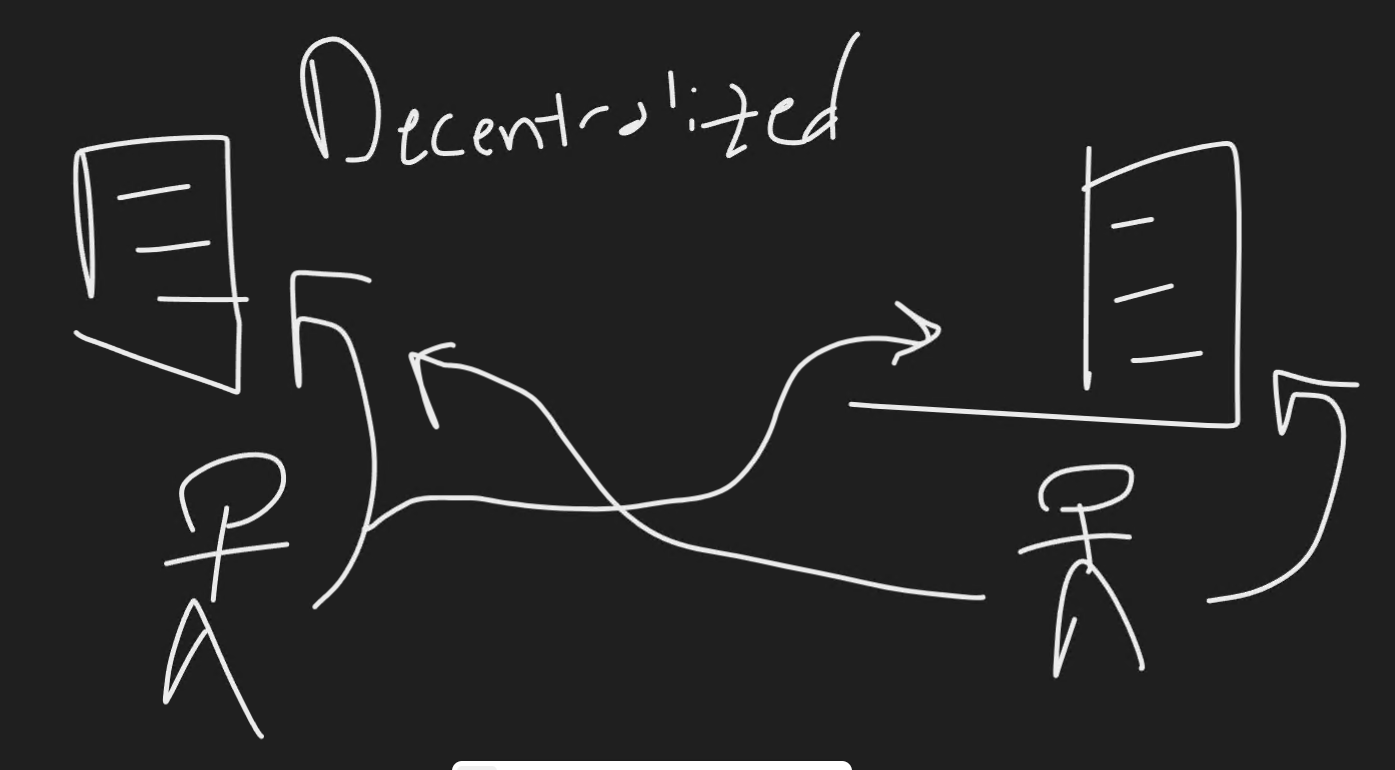
- Code is stored in a distributed method. Meaning when you perform a git clone and you compare that repository that you just downloaded to the repository on the remote, they will be exactly the same in full.
- Tracks the full history of changes on each separate node.
- Allows for offline capabilities because you do not just have a working copy of a section of the repository, you have a full identical copy.
Examples:
- Git
- Released in April 2005 and was created by Linus Torvalds. Most popular option in modern day.
Creating a Repository and pushing code to GitHub
So back to our example, after many inconvenient USB passes, you guys decide to create a git repository on GitHub. To keep it simple, GitHub is a platform that allows its users to create, store, manage, and share their code. We are going to be using Git (a distributed source control tool) and the GitHub CLI (a command-line tool that helps you manage GitHub without leaving your terminal). Below I'll show you how to create a repository and push your code to it:
# Checks if you are logged into any GitHub hosts
gh auth status

# Logs you into your GitHub account
gh auth login

# Creates a repo in GitHub
gh repo create

# Turns your current directory into a local Git repository
git init

# Adds all changed files in the current directory and subdirectories to the staging area.
git add .

# To see the changes to be committed (green) and the changes not staged for the commit (red)
git status

# To see what exactly changed in the staged files
git diff --cached

# Saves a snapshot of everything that was marked in the add command
git commit -m "This is the initial deployment of my website"

# Shows the logs of commits
git log

# Checks to see what remote origins are present
git remote --verbose

# Adds a remote origin to push the code to our new repo
git remote add origin https://github.com/cloudnavium/our-new-website

# Checks what branches exist
git branch

# Pushes our local repository to our remote
git push origin master
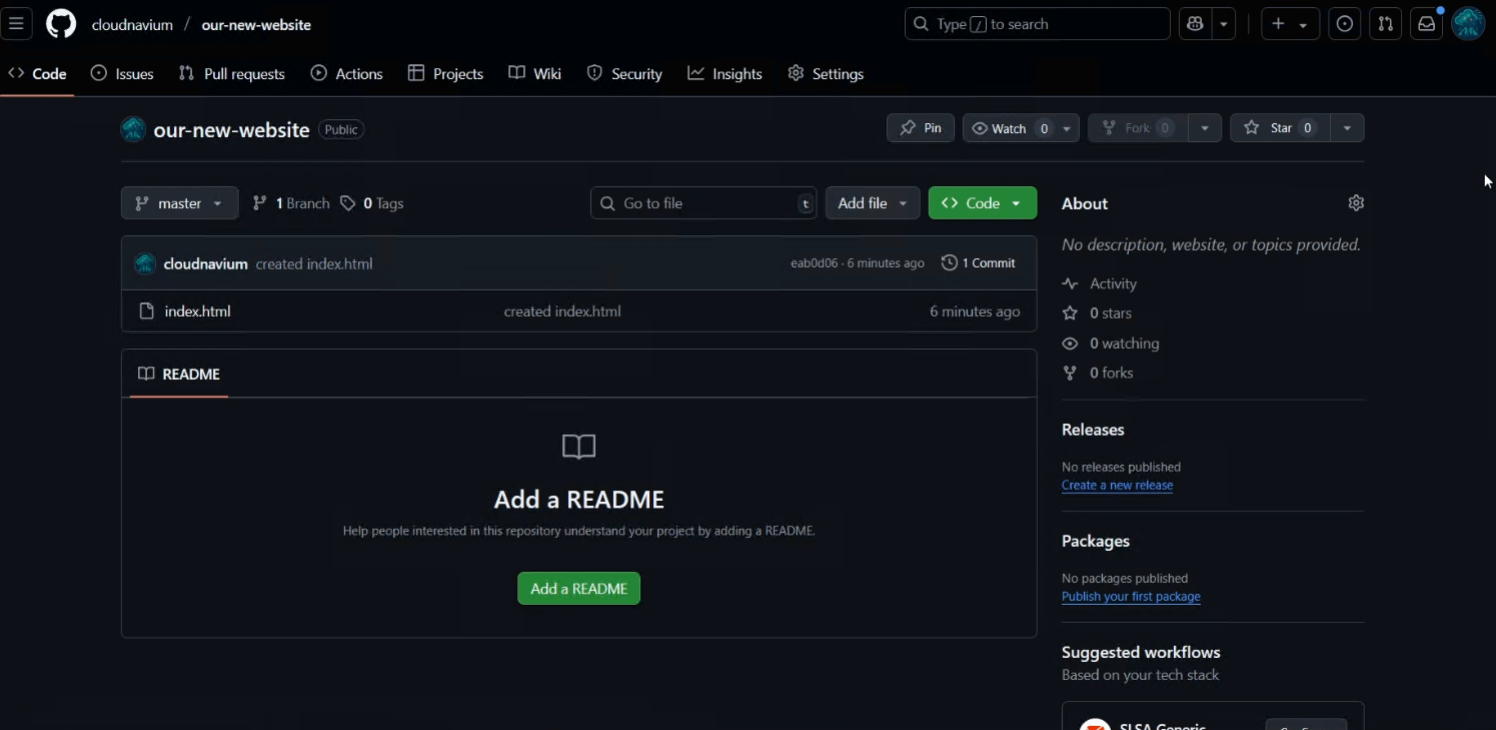
Bam. And just like that, we’ve gone from coding in isolation to using a shared GitHub repository that both of us can contribute to, track changes in, and collaborate on. No more USBs.
GitHub CLI | Take GitHub to the command line
Making changes to our new repository
Now that we have established our repository, what if we recruit our other buddy, Marcus, to help us with our project. He is going to need a copy of our code, how can he acquire that?
# Clones the repository from the source URL
git clone <repo-url>
This command copies the full repository which means full history and all branches. Now that we have a copy of the code, Marcus can make changes.
Marcus decides he wants to change the color of the h1 selector in our CSS file. Once Marcus has made his changes, for example changing the h1 color in the CSS file to red, he is going to want to commit and push those changes:
git add .
git status
git commit -m "Changing the color to red"
git log
git push origin master
Now if you take a look at the GitHub repository you will see it should now show two commits and the files that were modified will have the same message as the last commit.
Branches
When developing your website you might want to create additional features or maybe even have a different place to experiment and test new things. This is where branches come into play. Branches are lightweight pointers to commits, allowing you to isolate work without affecting the main project history.
You decide you want to work on version 2 of your website. In version 2, you decide to do something crazy: adding an image to the homepage. A little ambitious, so you decide to make a branch from main and you call it version 2:
git checkout -b version2
This will create a new branch and set it as the current environment. To verify this utilize the following commands:
git status

# Lists all local and remote-tracking branches. The current branch is marked with an asterisk (*).
git branch -a
Okay now that we made our changes on our new version 2 branch, we are going to want to push it up to our GitHub repository. So we try the usual Git flow to commit and push our changes:
git add .
git commit -m "Creating our version 2 branch and adding an image"
git push origin master
But hold on, why did the terminal just return "Everything up-to-date"? That can't be right, we just made some changes.
The problem is that we specified the master branch in that push command. We said "git push my changes to the master branch on the remote called origin." Git interprets this as pushing the LOCAL master branch to the REMOTE master branch, so this isn't what we want. What we want to do is:
# Pushes our local version2 branch to the remote and creates it on GitHub
git push origin version2
If you take a look at our GitHub repository you will see that we now have two branches. Our new branch, takes the previous commits the branch that it stems from. Since our original master branch had two commits, version2 will have those plus one more from our image update, totaling three commits.
Different Merge Strategies
Fast Forward Merge
A fast forward merge is the cleanest kind of merge. It happens when the branch you're merging into hasn’t moved since the feature branch was created. Instead of creating a new merge commit, Git just moves the branch pointer forward. The result is a nice, linear history like everything happened on the same line.
main:     A---B
				\
version2:         C---D
After merge:
main:     A---B---C---D  (no merge commit)
Merge Commit
A merge commit is used when both branches have diverged. Instead of just moving a pointer, Git creates a new commit that combines the changes from both branches. This keeps both histories intact and clearly shows when branches came back together. It’s useful when you want full context and traceability.
main:     A---B
				\
version2:          C---D
						\
After merge:              M  (merge commit)
Squash Commit
A squash commit flattens all the commits from a feature branch into one single commit before merging it into the target branch. This is great when you want to simplify the history and don’t care about each individual step — for example, collapsing all your trial-and-error commits into one clean update.
Before:
main:       A---B
                  \
version2:           C---D---E

After squash merge:
main:       A---B---F
                     ↑
                (squashed commit containing C, D, and E)
Rebase
Rebasing takes your branch and replays its commits on top of another branch, rewriting history to look like your work happened after it. It creates a clean, linear sequence of commits, but because it changes history, it should be avoided on branches shared with others. It’s powerful but needs to be used carefully.
Before:
main:     A---B---C
version2:     X---Y

After rebase:
version2:             A---B---C---X'---Y'
Different Branching Strategies
Git Flow
Git Flow is a more structured way of working with branches, and it’s great if you have planned release cycles. You’ve got main holding your production-ready code and develop acting as your main integration branch where features get merged in before release. For new features, you create a feature/* branch. When you’re getting ready to ship, you spin up a release/* branch from develop, finish polishing, and then merge into main. If there’s an urgent production bug, you create a hotfix/* branch straight from main so you can fix it and push it out quickly, then merge it back into both main and develop to keep everything in sync.
GitHub Flow
GitHub Flow is like Git Flow but simplified, it’s made for teams who ship fast and often. You start by creating a branch directly from main, do your work, and push it up. Then you open a pull request so your team can review the changes. Once it’s approved, you merge it back into main and deploy. That’s it. It’s super lightweight and perfect if you’re doing continuous deployment.
Trunk-Based Development
Trunk-Based Development is all about speed. There’s just one main branch (the “trunk”), and everyone commits to it directly — no long-lived feature branches. You keep changes small, push often, and usually hide incomplete work behind feature flags so it’s safe to deploy. Because there’s no branch juggling, it’s great for agile teams with solid CI/CD pipelines that can handle quick turnarounds.
Release Branching
Release Branching is what you’d use if you need to support multiple versions of your software at the same time. Each version gets its own branch, and any bug fixes for that version happen there. Meanwhile, new development happens elsewhere, so you’re not mixing future work with maintenance updates. This approach works well for products that have customers running different releases in production and need long-term support.
Now that was a good introduction to Git, still a lot left to learn but we'll keep moving forward and learning as much as we can!